
How I Automated All Hero Images with Hermes Agent & Nano Banana 2
Manually designing header illustrations for every notes post is a friction point that delays publishing. This is how I built a zero-touch pipeline using Gemini 3.1 Flash Image (Nano Banana 2) and an ImageMagick sidecar to generate, key, and deploy consistent character-driven hero images.
The Procrastination of Imagery
Every single notes page on this site requires a hero illustration to visually anchor the topic. But as a developer and lone writer, creating visuals is an exhausting hurdle.
- Running loops of prompts on image APIs takes multiple manual retries to match the intended scene.
- Keeping character style and facial features consistent from post to post is notoriously hard with standalone APIs.
- Raw model outputs always generate on flat solid backgrounds instead of transparent alphas. Removing these dark backdrops by hand in image editors before publishing acts as a major friction point.
This visual chore created a publishing bottleneck. Posts were completely drafted and written, yet sat unreleased for weeks because they “still needed a hero image.”
The Solution: A Zero-Touch Generation Pipe
Instead of wrestling with Photoshop or running manual prompts, I automated the work. The pipeline uses OpenRouter’s google/gemini-3.1-flash-image (Nano Banana 2) paired with a local ImageMagick step.
The system keeps the character consistent by sending the master character sheet to the model as an image input alongside each post’s scene brief:
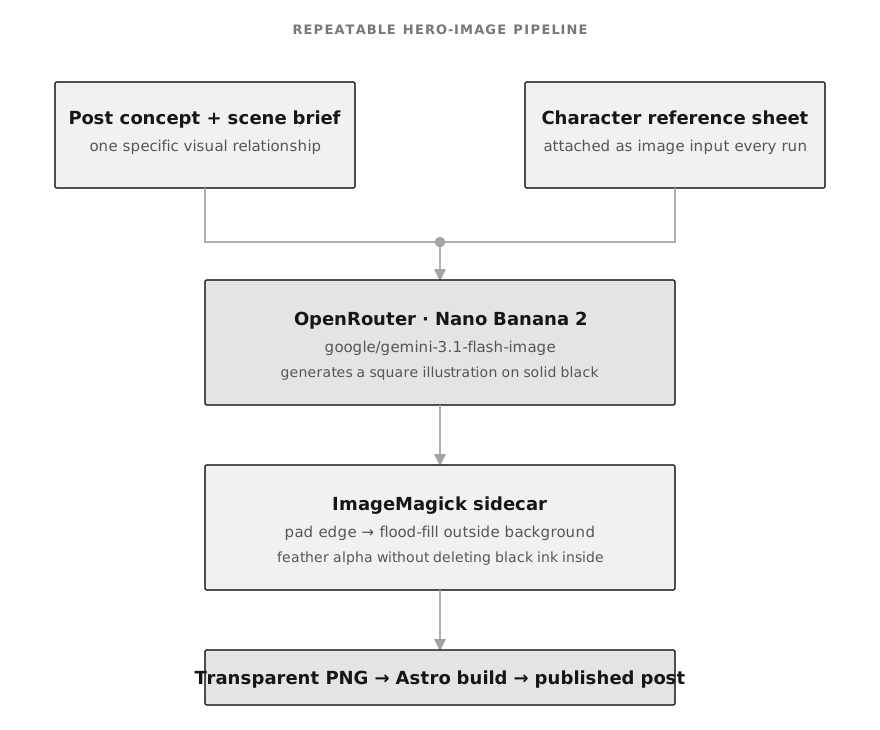
To make the workflow repeatable with just a single chat line, I packaged this entire process into a reusable Hermes skill called thanhan-dev-post-hero-images. Now, I simply tell my agent:
“Create hero image for the new post on X”
And the agent grabs the content, writes the scene prompt, calls the API with the master reference sheet, runs the transparency cutouts, and commits the assets all on its own.
The Master Reference Sheet
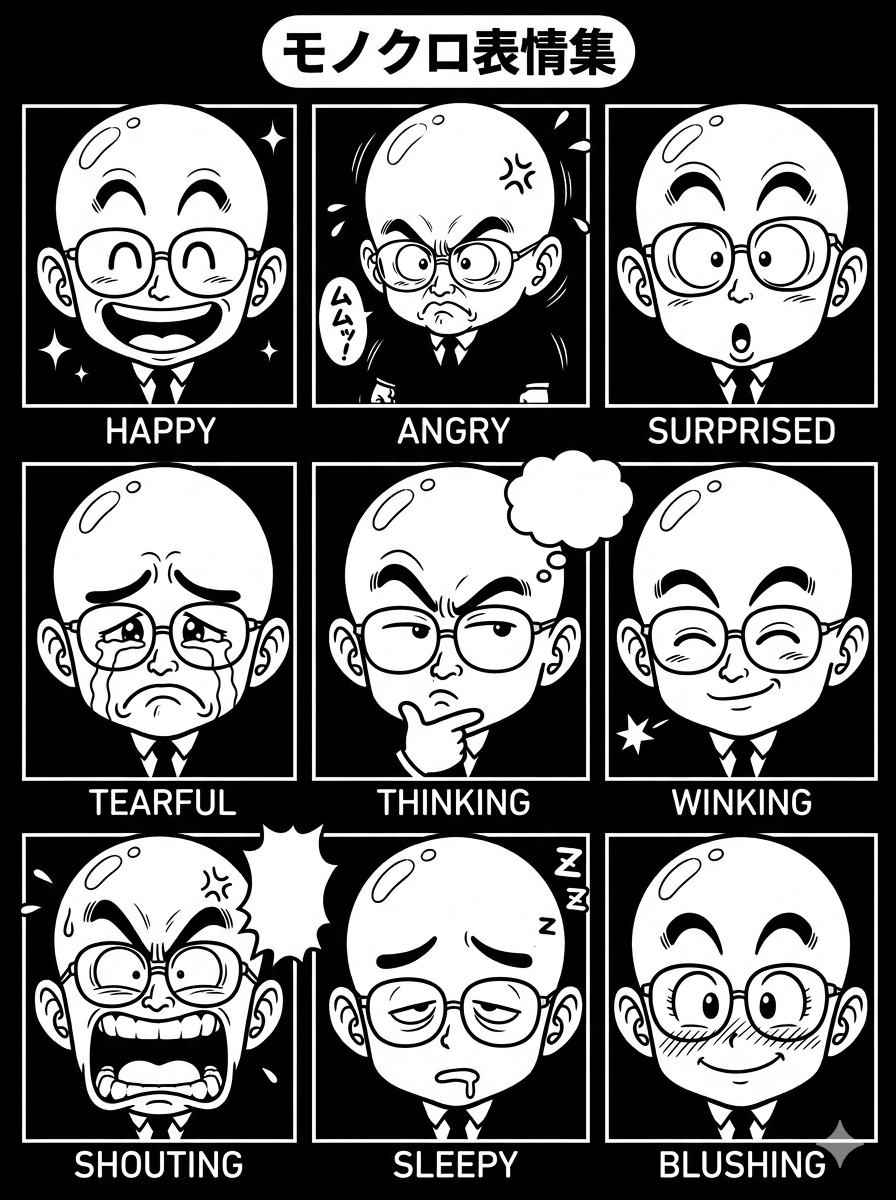
This is the exact expression sheet passed to the generation script as a parallel image input. It is not a finished hero image: it is the visual ruler that holds the scalp shine, thick brows, round glasses, wardrobe, line weight, and expression range steady across new scenes.
Licking the Black Background Problem
Models generate best on solid backdrops; they cannot emit clean transparent PNG alpha channels natively. To convert the raw black-background output into an adaptive asset that blends with both light and dark site themes, Hermes runs a post-processing chain.
We cannot use a clumsy global “extract black” pass, as that destroys the character’s pupils, dark jacket, outlines, and interior line details. Instead, the automated sidecar uses a padded floodfill to dissolve the background from the outside in:
# 1. Add a temporary border so all perimeter background margins connect
magick raw-hero.png -bordercolor black -border 4x4 padded.png

# 2. Floodfill transparency starting only from the outer border corner
magick padded.png -alpha on -fuzz 3% -fill none -draw 'color 0,0 floodfill' cutout-padded.png

# 3. Shave the temporary border off
magick cutout-padded.png -shave 4x4 cutout.png

# 4. Extract and feather the alpha mask to make smooth anti-aliased edges
magick cutout.png -alpha extract -blur 0x0.65 mask.png
magick raw-hero.png mask.png -alpha off -compose CopyOpacity -composite transparent-hero.png
This ensures the inner black ink of the illustration is beautifully protected, while the exterior silhouette fades cleanly into the background:

The Takeaway: Give This Blueprint to Your Hermes Agent
This is not an image prompt. Copy it into your own Hermes Agent and have it build the reusable pipeline around your own character sheet and site:
Build me a reusable post-hero image pipeline in this repository. Start by inspecting the existing content structure, image conventions, and build command. Use the conventions you find instead of inventing a parallel system.

Requirements:
1. Create a permanent master character reference sheet path under the repository assets. Every generation must attach that same sheet as an image input, not merely describe the character in text.
2. Add a small generation script that reads `OPENROUTER_API_KEY` from the environment and calls OpenRouter's `google/gemini-3.1-flash-image` model. Send both the scene brief and the base64-encoded reference sheet in the request. Generate a square image on a solid black background; do not request transparency from the model.
3. Save the raw output outside the published asset directory. Resize the approved output to the site's image standard.
4. Use ImageMagick to remove only the black background connected to the outside edge: add a temporary black border, flood-fill from its corner with a small fuzz tolerance, remove the border, then feather the alpha mask. Do not use global black-to-transparent conversion because it would erase black linework, clothes, and pupils.
5. Copy the verified transparent PNG to the site's public image directory, wire it into the relevant post metadata, and keep the scene prompt beside the project assets for reproducibility.
6. Package the exact paths, generation command, ImageMagick steps, QA checks, and build verification as a reusable Hermes skill so a future request such as "Create a hero image for [post]" can run the whole workflow.

Before changing files, show me the paths and commands you found. Then implement the pipeline, run the real build, and report the generated asset, modified routes, and verification output. Never expose the API key.
Let’s Automate Your Visual Pipeline
Removing mechanical steps of content production is how you free up time to focus on writing. If you want to connect visual references, set up local image processing pipelines, or install custom tools inside your agent:
- Discord Chat:
annguyen175(Or send a direct message via this link) - Email:
[email protected] - Facebook Discussion Group: vnhermesagent